Email Support
We do not offer technical support for third party email software or devices and recommend finding the vendors documentation to add and manage accounts. Any information regarding third party email software is provided for information purposes only.
If you are having any problems with your webmail or with managing your email accounts in your cPanel, please contact us directly or check official cPanel documentation here.
- Email Support Articles
- Premium Email
Setting Up Your Email Account In Windows Live Mail
(please note that this article shows Windows Live Mail 2011, the steps may vary in the different versions of Windows Live Mail)
Note - wherever you see 'yourdomain.com', replace this with your actual domain name (website address not including the 'www')
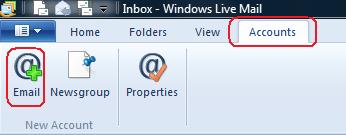
1. With Windows Live Mail open, click on 'Accounts' then 'Email' at the top left of the screen (note - if you don't have an accounts tab you are probably using an older version of Windows Live Mail, try going to 'tools' -> 'account settings' in your menu instead.)
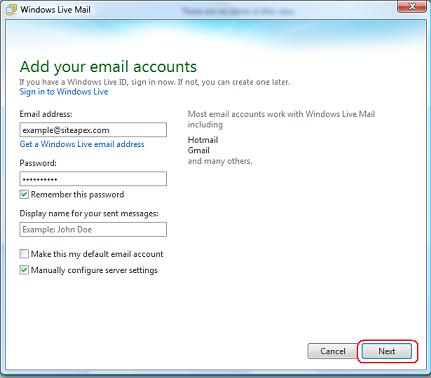
2. A box will come up, enter your email address, password, and make sure to choose the options to remember password and manually configure server settings -> then click the 'next' button.
3. On the following screen, there are a few fields to fill out (see notes below). When you're done, click 'next'.
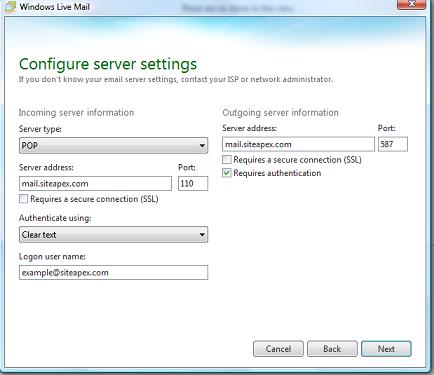
- Server type - POP will work for most scenarios, the server also support IMAP
- Server Address - Enter 'mail.yourdomain.com' here.
- Incoming Mail Port - 110 for POP or 143 for IMAP
- Authenticate Using - leave this as cleartext
- Logon User Name - enter your full email address here
- Outgoing Server address - enter 'mail.yourdomain.com' here
- Outgoing mail port - 587 or 25 will work with our servers, but we recommend trying 587 first as many internet service providers block port 25
- Requires a secure connection - No leave this unchecked
- Outgoing Server Requires Authentication - yes, check this option off
4. You're done - to test your settings, click the send/receive button on the Home Tab.