SiteApex Administration Help & Tutorials
Please use the topic links below to see a list of tutorials for that particular topic or module. Or you can use the search button to search for help on a specific topic.
Note: there are a few non-default modules listed here. Please contact sales if you are interested in any of these modules.
- Getting Started
- Page Editing
- Ad Manager
- Blog Module
- Bulletin Board (BBS)
- Calendar Manager
- File Manager
- Form Builder
- League Module
- Media & Resource Library
- News Letters
- News Manager
- Photo Album
- Staff List
- Shopping Cart
- Directories Module
- Indexed Articles
- Questionnaires
- Job Posting
- Mobile Devices
- Control Panel
- SMTP - Outgoing Mail
- Security & User Groups
- Templates
- Plugins
- SEO
- WCAG / Website Accessibility
Managing Form Responses
Introducing a new way to manage your form responses! You now have the ability to search for responses, send responses newsletters right in the FormBuilder module, and organize the responses by status the way you want! See our SiteApex version log (in the top right corner of your admin) for a full list of upgrades.
Viewing Responses
To view your forms responses you can now click on "View Responses" from the main "List Forms" area or click on the new form option "Search Responses".

Searching Responses
This search tool is a quick way to find form responses from all of your websites forms. Search specific forms by selecting the form in the first select box.
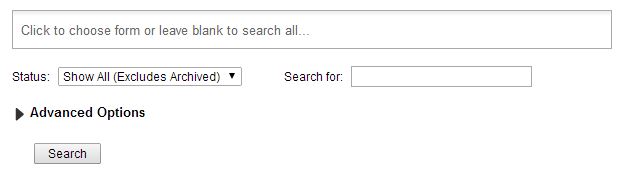
- The top bar displays forms you are searching. You can place your cursor in this box to display a dropdown list of forms and click to select. You can also use your keyboard to type names of forms to find them quickly and press Enter to select. Backspace will also remove a form listed here.
- Status allows you to filter responses by specific form status or you can choose to show all responses (default)
- Search For allows you to search for keywords in responses.
Advanced Search Options
Clicking on "Advanced Options" reveals more search filters/options.
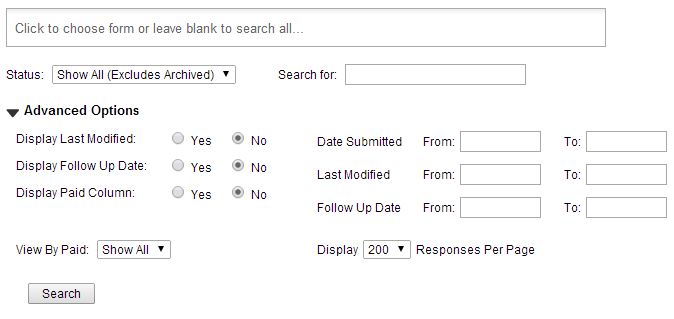
- Display Last Modified: Display the last modified date column in your response list results.
- Display Follow Up Date: Display the follow up date column in your response list results.
- Display Paid Column: Display the paid (Yes/No) column in your response list results.
- Date Submitted: View responses in a custom date range according to the date they were submitted.
- Last Modified: View responses in a custom date range according to when they were last updated or changed.
- Follow Up Date: View responses in a custom date range according to their "Follow up Date”
- View By Paid: If you are using the page for gathering payment you can view responses that are Paid, not paid or all responses. Defaulted to ‘Show All’.
- Display: change how many responses are on 1 page of your view responses list. Defaulted to 200 responses per page.
Export/Newsletter

Clicking on Export will download a comma-delimited file (.CSV) of all current responses currently loaded. Use this to import into another database system or software that supports this type of file import. Note: Export option only appears when displaying responses from a single form.
Send a Newsletter allows you to use send an existing or new newsletter to the users in all the responses loaded. There is a setup by step wizard to setting up and sending the newsletter.
Response List
By default the following columns are shown in the response list: response identification number, Name, Email, Status, and date/time Submitted. Beside this are the response options:
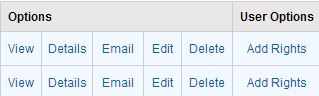
View
Click to view all data collected on the response. Opens in a pop up.
Details
New details area shows a log of all action taken on this response. Tracks response edits, status changes, newsletter sends, file attachments uploads, notes and date changes.
Email
Click to send this response email a Newsletter.
Edit
Allows you to edit a response if changes are required. This is logged now.
Delete
Remove a response from the system.
Make User/Add Rights
Clicking "Make User" will create a system user from this response using as much data from the response. Note: it is recommend to have a security group selected on the form before clicking this to associate them with a group. You can attach them to the group by then clicking "Add rights".
Managing Form Response Statuses
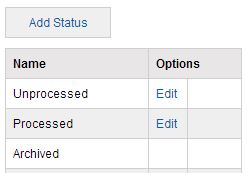
You now have the ability to use your own status labels to organize responses. Prior to this we only had 2 options "Processed" and "Unprocessed". Now, not only can you edit the names of our 2 default status but also create your own set of status types (no limit to the amount of statuses). Manage status types by clicking "Manage Statuses" on the toolbar.

Once here you can add a status or "Edit" an existing status name.
Changing a Responses Status
Now that you have statuses to organize responses. You can change the status by doing any of the following:
- Editing a response
- Viewing a response
- In the main Response List view check off responses to select more then 1 response. At the bottom of the list view choose the status in the "Change Status" drop down menu and click "Go".