SiteApex Administration Help & Tutorials
Please use the topic links below to see a list of tutorials for that particular topic or module. Or you can use the search button to search for help on a specific topic.
Note: there are a few non-default modules listed here. Please contact sales if you are interested in any of these modules.
- Getting Started
- Page Editing
- Ad Manager
- Blog Module
- Bulletin Board (BBS)
- Calendar Manager
- File Manager
- Form Builder
- League Module
- Media & Resource Library
- News Letters
- News Manager
- Photo Album
- Staff List
- Shopping Cart
- Directories Module
- Indexed Articles
- Questionnaires
- Job Posting
- Mobile Devices
- Control Panel
- SMTP - Outgoing Mail
- Security & User Groups
- Templates
- Plugins
- SEO
- WCAG / Website Accessibility
Building a Form - Advanced Options
When editing a form you will notice 4 tabs of options on the Form you are editing. General, Advanced, Security and E-commerce.
Here we will cover the Advanced tab and all of it's features.
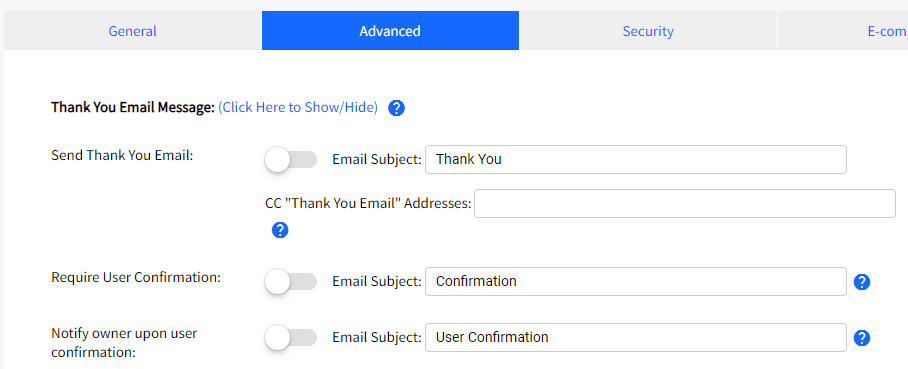
Thank you Email
Thank You Email Message - Create a message that can be sent when the form is submitted. Make sure to enable the next option Send Thank You Email.
The contents of this message will display at the top of the email above the form answers they completed. Their field answers are included in the email by default, you can disable this in the Security tab.
Note: this email is not sent on an unsuccessful payment submission as it is deemed incomplete.
Send Thank You Email - Enable the 'Thank You Email' by choosing Yes. Edit the Subject if you wish to customize this.
If you want to receive receive a copy of what the form visitor receives you can add an email addresses to the CC "Thank You Email" Address field.
User Confirmation Feature
Require User Confirmation - Turning on this feature will delay the users form response until they approve it. You must ask for their email address to use this feature as it will send an approval link email as soon as they submit your form.
This is another way to prevent spammers from submitting spam responses on your website.
We recommend explaining they will need to confirm their response before it will be submitted in the Thank you Message set in the General tab.
Notify owner upon user confirmation - If you are using the Confirmation feature you can also notify the form owner by email when someone has confirmed their response. Note you can edit the Subject text of this email.
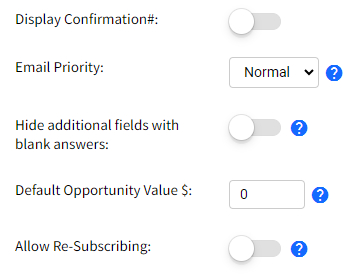
Display Confirmation - Turning on Display Confirmation show the form confirmation ID in the body of the Thank you email message.
Email Priority - Email priority is used by some 3rd party mail clients to visually display the importance of the incoming email. Some mail clients (including Outlook, Hotmail) provide some visual distinction to high priority emails while others such as Gmail do not show any indication that an email was marked with high priority.
Hide additional fields with blank answers - Enabling will hide additional fields with no answers on the form Thank You display as well as the response data included emails. By default, additional fields which do not have submitted answer values are still displayed.
Default Opportunity Value $ - Enter the projected dollar amount each lead (form submission) is potentially worth. If this form is a payment form, the value will be automatically set on payment to the payment amount.
Allow Re-subscribing - When enabled, this will allow people to re-subscribe to a newsletter after unsubscribing. When not enabled, it is impossible to re-subscribe to a newsletter with an unsubscribed email address.
Page Breaks
The page breaks feature allows you to make your form multiple "pages". This is helpful if you have a large form and want to shorten the page or group the fields into steps.
These options require the use of the Form Field Type "Page Break". You can add a Page Break as an additional field when editing a Form and managing your Additional Questions. Learn how to add additional fields.
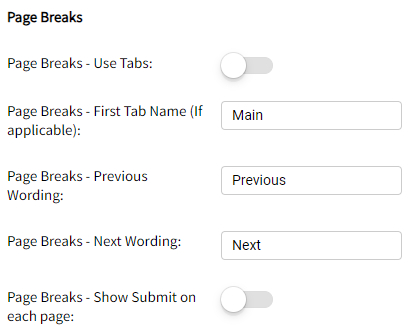
Use Tabs - If you have a page break field in use you can enable the forms pages to appear as tabs. Each tab will contain the text from the Page break text set when editing the fields.
First Tab Name - If using tabs set the text on the first tab text as this doesn't require an additional field.
Previous Wording - If not using tabs there are buttons at the bottom to move back and forward between field pages. Customize the wording on the button if you wish.
Next Wording - Customize the text on the move forward or next button to go to the next page of fields.
Show Submit on each page - by default the final Submit button will always show on the last page if using page breaks. You can allow your site visitors to hit submit at any time though by displaying the submit button on each page. Only recommended if most questions are optional.
Click to to go the the next article: Building a Form - Security