SiteApex Administration Help & Tutorials
Please use the topic links below to see a list of tutorials for that particular topic or module. Or you can use the search button to search for help on a specific topic.
Note: there are a few non-default modules listed here. Please contact sales if you are interested in any of these modules.
- Getting Started
- Page Editing
- Ad Manager
- Blog Module
- Bulletin Board (BBS)
- Calendar Manager
- File Manager
- Form Builder
- League Module
- Media & Resource Library
- News Letters
- News Manager
- Photo Album
- Staff List
- Shopping Cart
- Directories Module
- Indexed Articles
- Questionnaires
- Job Posting
- Mobile Devices
- Control Panel
- SMTP - Outgoing Mail
- Security & User Groups
- Templates
- Plugins
- SEO
- WCAG / Website Accessibility
Building a Form - Security Options
A form can be used to create website users, assign them to a group and set a response status automatically. There are combinations of settings that determine if you want the process automated or if an Administrator will manually process users and statuses.
Creating Users and Assigning to Groups
Setting a Form to connect form entries to a group allows you to store them as a site users. In combination with page security and various other modules here are some functions that users could take advantage of with a login.
The main reason to automatically assign someone to a group could be for a Newsletter sign up form. This means they are assigned to the group that you send emails too. Next time you send one, this user would be included in the next send.

Auto Process Requests - Enabling auto process requests means the status of each form entry is immediately marked as "Processed". More importantly, if a group is selected in the Associate to groups they will automatically be assigned to that security group.
If Auto Process Requests is left disabled, no gives you an opportunity to process forms manually on each response. Allowing you to examine the person’s request before considering it "Processed” in status or as user. This is managed in the Form Responses area of the Form Module.
It makes no difference to the system if you manually or automatically process forms. This feature’s only purpose is to offer you a method for managing your form response and the users. You can also make custom statuses by going to Manage Statues at the top your Form Builder module.
Associate to groups - To create website users from your responses or to move contacts into a Newsletter group you will need to attach the responses to a security group. Choose a security group in the drop down.
If you choose to "Auto Process" (see feature above) form responses will automatically be placed in the Security group. If you choose not to "Auto Process" responses you can manually move responses into groups when viewing the forms Responses. See this article explaining form responses and actions you can apply to them.
Auto Apply Status
If you want to apply a specific status to this forms responses as soon as they are submitted turn on Auto Apply Status. You can then choose which status to apply to them. You can create custom statues in the Response Status area of Form Builder.
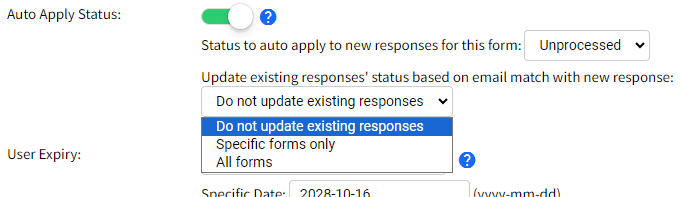
In addition to applying a status to new responses, there is an extra feature where the system will automatically change the status for existing responses that have the same email address with a new response.
This could be useful in situations where multiple forms have one desired outcome for someone to become a member for example. Instead of tracking statuses of one person's responses across multiple forms, you could have this feature update the status for responses from other forms so you don't have the risk of contacting the same person twice for follow up etc.
Additional Security Options
User Expiry (Optional) - If you set the form to auto-process and create or update users using forms, you can also set an optional User Expiry for those users. Simply select the expiry that best suits your requirements, or fill in a static expiry date (yyyy-mm-dd format) if you need users to expire on an exact date.
Please note that user expiry in this form relies on auto-process being enabled, it will not be set if you manually "Make me a user" in the form admin. When a user hits the expiry day it prevents them from logging into the site in any way. They will need to fill out a renewal form that would set a new expiry date on that user.
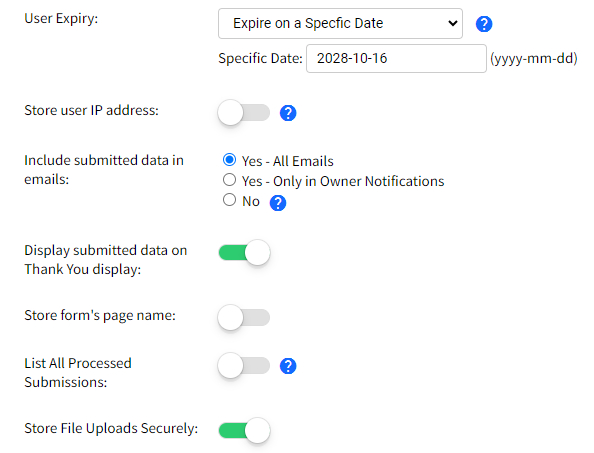
Store user IP address - Includes the site visitors IP address. Turn this on if you are receiving a lot of spam. You can contact support and let them know a particular address is being spammed and we can possibly look into blocking it from accessing your website.
Include submitted data in emails - Adds all form fields and answers to the owner notification email and Thank you message.
Store form's page name - Adds a reference to the web page the form was filled completed on.
List All Processed Submissions - Throw back to the old "Guestbook". You can publicly display all form responses on the form page below the form. Examples might be a testimonial page or public review page. Again remember this is public unless placed on a secure page.
Store File Uploads Securely - If you are using the File Uploader field on your form and are concerned about storing this files securely turn this on. This will place the files on your site in a location that cannot be accessed publicly. As the site administrator you can retrieve these files directly from the form response once logged into your SiteApex Admin.
Click to to go the the next article: Building a Form - E-commerce