SiteApex Administration Help & Tutorials
Please use the topic links below to see a list of tutorials for that particular topic or module. Or you can use the search button to search for help on a specific topic.
Note: there are a few non-default modules listed here. Please contact sales if you are interested in any of these modules.
- Getting Started
- Page Editing
- Ad Manager
- Blog Module
- Bulletin Board (BBS)
- Calendar Manager
- File Manager
- Form Builder
- League Module
- Media & Resource Library
- News Letters
- News Manager
- Photo Album
- Staff List
- Shopping Cart
- Directories Module
- Indexed Articles
- Questionnaires
- Job Posting
- Mobile Devices
- Control Panel
- SMTP - Outgoing Mail
- Security & User Groups
- Templates
- Plugins
- SEO
- WCAG / Website Accessibility
2023-08-24
The Blog Signup Form
The blog signup form is for allowing people to sign up to your blog. Once signed up, a user is then allowed to post comments on your blog posts.
To start, you first need to create the form using the form manager module.
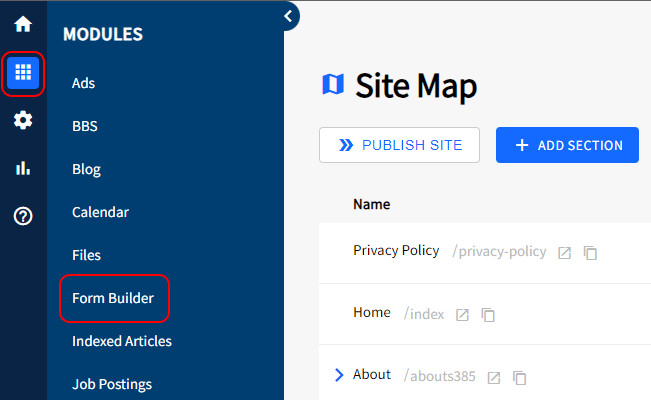
- To do this, go to Modules icon
 , then Form Builder in the admin area of your website.
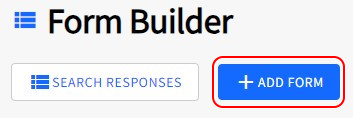
- Click on the +ADD FORM button at the top of your screen.
- To setup the Sign up form make these changes to the new Form.
a) Form Name - Give your blog signup form an easy to recognize name. You could use something like "Blog Signup Form"
b) Include a Notification email address only if you want to be emailed when someone signs up to the Blog.
c) We highly recommend always using the Spam Blocker to stop spammers from populating your form with bots.
d) Form fields - This is at the bottom of the 'add form' page. Choose what information you want to collect, but definitely make sure that you enable email, the Username and Password fields so that new users can enter the login information they would like to use.
e) Security tab: Auto Process Requests - Turn on if you want new users to be automatically approved. If you leave this option off you will need to log in regularly and review the form responses to manually approve new blog users.
f) Security tab: Associate to groups - In this setting, look for the 'Blog Users' group and click on it to select it.
- Click "Create Form" to save and make your form. When you're done filling out the details of your blog signup form, click 'Create Form'. Now your new form is created and ready to be added to a page.
Adding your Blog Sign Up Form to a Page
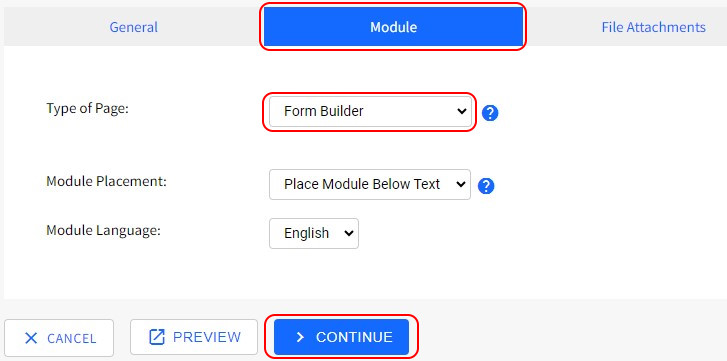
You will need to add your form to a page on your website. You can do this by setting the Page Type to Form.
- Create a new Section, Category or Page in the Site Map or Edit an existing page.
- Click on the Module tab.
- In the Type of Page option drop down box, select Form Builder and click Continue at the bottom of the page.
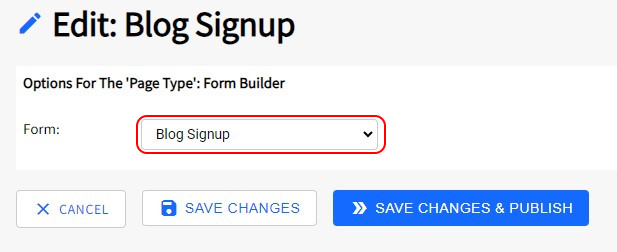
- On the next step, select the Blog by its name that you wish to add to this page.
- Launching your Blog.
Choose Save Changes if you are simply wanting to get this page ready for a future launch. Maybe you haven't created Posts yet on your Blog.
Choose Save Changes & Publish if you want to launch your Blog and you have at least 1 post ready.
Setting Up the Blog Signup Link
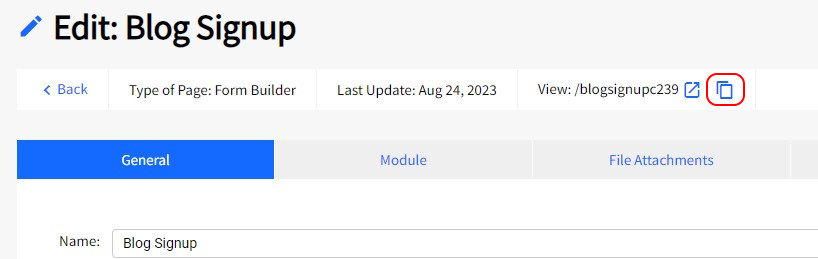
In the Site Map retrieve the page link on your new Blog signup page.
- In your SiteMap. Edit the Page you setup the Blog Sign up Form
- Click on the Copy URL Icon
 to save the page's URL to your computers clipboard.
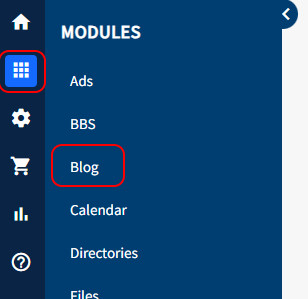
- Now you need to add this URL to your Blog settings.
In the main menu go to Modules> Blogs.
- Find your blog in the list of blogs and click on Edit beside it.
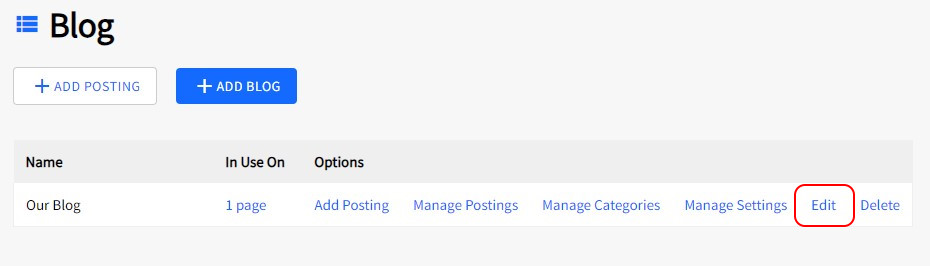
- On the Blog edit screen, look for the Blog User Signup Link field and paste in the URL you copied in step 2.
- Then click submit.
Now users can sign up to your blog using the form you created and when logged in leave comments on your posts.