SiteApex Administration Help & Tutorials
Please use the topic links below to see a list of tutorials for that particular topic or module. Or you can use the search button to search for help on a specific topic.
Note: there are a few non-default modules listed here. Please contact sales if you are interested in any of these modules.
- Getting Started
- Page Editing
- Ad Manager
- Blog Module
- Bulletin Board (BBS)
- Calendar Manager
- File Manager
- Form Builder
- League Module
- Media & Resource Library
- News Letters
- News Manager
- Photo Album
- Staff List
- Shopping Cart
- Directories Module
- Indexed Articles
- Questionnaires
- Job Posting
- Mobile Devices
- Control Panel
- SMTP - Outgoing Mail
- Security & User Groups
- Templates
- Plugins
- SEO
- WCAG / Website Accessibility
General Blog Module Administration
When you access the Blog in the Admin you are presented with any Blogs that are created and the option to +Add Posting or +Add Blog. This document is to review the general Blog module use.
Clicking on +Add Posting will ask you which Blog to add your new post to and continuing on will let you create your post. Add Post Details.
Clicking on +Add Blog will start the creation of a new Blog. New Blog Setup Details Here.
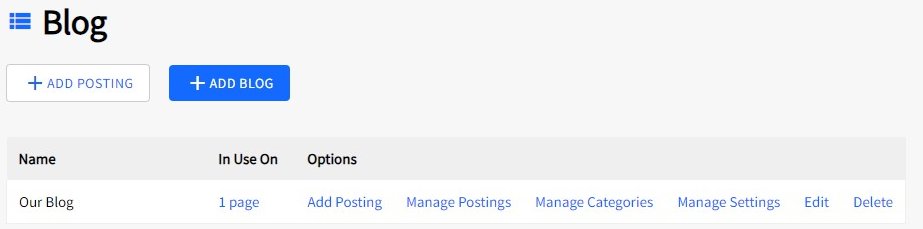
In Use On - click to view where that particular Blog is setup on your website or if it is not it will say "0 pages".
Add Posting - Create a new post for your Blog.
Manage Postings - Lists existing posts and provides the following options: Edit Post, Delete Post, Manage comments (if enabled) and Deactivate/active. See more for details below.
Manage Categories - Add/Edit your Blog categories.
Manage Settings - Modify Blog display options. Such as how many posts display at once or how many characters of a post to display before they must open the full post.
Edit - Make changes to the Blog name, security settings and RSS options.
Delete - Delete your Blog and it's Posts. Proceed with caution this is a permanent delete. If you would rather hide your Blog we recommend simply Deactivating your page that hosts the Blog. See how to Deactivate here.
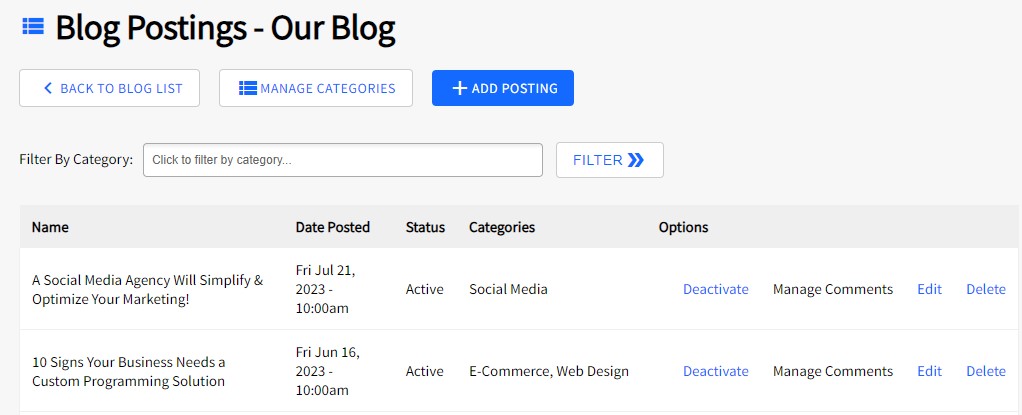
Manage Postings
Clicking on Manage Posting will present all the Posts within a Blog. This allow you to modify Posts after the fact.
It display details such as date it was posted and which categories it is part of.
You can also Deactivate a Post, Edit, Delete and Manage Comments on a post.
Manage Settings
The Blog Settings area allows you to modify some post display settings.
How many postings on the main page?
You can display as many or little posts on the main blog display. When it reaches your limit the Blog page displays a "More Posts" link after the last Post displayed on the page.
Blurb Length? (Measured in Characters)
The characters you would like to display and allow the viewer to read before they must click the read more link to view the full post. This is measured in single characters.
How many archives on the main page? (Measured in Months)
By default the Blog can generate a list of Months in the right side column that contain Posts. You can choose how many months you want to display.
Show the owners email address?
Displays the email address of the user that posted.
Show the owners user name?
Displays the username of the user that posted.
Show the date posted?
Displays the date posted.
Show the time posted?
Displays the time the post was posted.
Date Format?
Default date format is: l, F d, Y
Example: Monday, September 10, 2023
You can modify this using the following characters
| Character | Meaning | Example |
|---|---|---|
d |
day of the month with leading zeros | 10 or 23 |
j |
day of the month without leading zeros | 10 or 23 |
D |
day of the week as a three-letter abbreviation | Mon |
l |
full day of the week | Monday |
m |
month as a number with leading zeros | 03 or 10 |
n |
month as a number without leading zeros | 3 or 10 |
M |
month as a three-letter abbreviation | Sep |
F |
full month | September |
y |
two-digit year | 23 |
Y |
full year | 2023 |
Time Format?
Default date format is: h:i a
Example: 10:15 am
You can modify this using the following characters
| Character | Meaning | Example |
|---|---|---|
g |
hours in 12-hour format without leading zeros | 1 or 12 |
h |
hours in 12-hour format with leading zeros | 01 or 12 |
G |
hours in 24-hour format without leading zeros | 1 or 13 |
H |
hours in 24-hour format with leading zeros | 01 or 13 |
a |
am/pm in lowercase | am |
A |
am/pm in uppercase | AM |
i |
minutes with leading zeros | 09 or 15 |
s |
seconds with leading zeros | 05 or 30 |
Creating a Username and Password
To create a Username and Password you must go into the "Control Panel" in the top left navigation of SiteApex and enter into the "Security" options. Once inside you can select "Add User" to add a username (required to login to blog), password (required to login to blog), as well as some other details. To allow a SiteApex User to use the Blog Module they must be included in the "Blog Users" group. You may also include them in any other groups that pertains to your Blog. When you are done click submit, and it will create the new user to specifications you have input.
Adding a Category
To add a category, within the "Blog Name" column, click on the Blog you wish to add a category to. Type in the name of the category and click on submit and your category will be created.
Quick Photo Post
On the site after login there is that lists all of the Blogs available. In order to add a "Quick Photo Post" you must find the blog you wish to add to, then select "Add" under the "Quick Photo Post" column. After this is done you can search your hard drive to select a photo, put a small description of the photo, select the Category you wish to place the photo, then submit it. This will post your photo along with the description on the Blog under the selected Category.