SiteApex Administration Help & Tutorials
Please use the topic links below to see a list of tutorials for that particular topic or module. Or you can use the search button to search for help on a specific topic.
Note: there are a few non-default modules listed here. Please contact sales if you are interested in any of these modules.
- Getting Started
- Page Editing
- Ad Manager
- Blog Module
- Bulletin Board (BBS)
- Calendar Manager
- File Manager
- Form Builder
- League Module
- Media & Resource Library
- News Letters
- News Manager
- Photo Album
- Staff List
- Shopping Cart
- Directories Module
- Indexed Articles
- Questionnaires
- Job Posting
- Mobile Devices
- Control Panel
- SMTP - Outgoing Mail
- Security & User Groups
- Templates
- Plugins
- SEO
- WCAG / Website Accessibility
Creating A Calendar Event
Once you have created a calendar (click to learn how to make a calendar) you will want to add your events.
- Continue in the Modules area of the Admin and make sure you are in the Calendar module by clicking on the module name in the left menu.

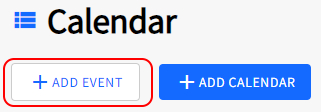
- If you have created a calendar click the Add Event button.
- Complete all the settings you require for your event and click Submit at the bottom of the page. Below are descriptions of the event features and additional ways to use your calendar event.
Setting Event Options
Watch Video on this subject
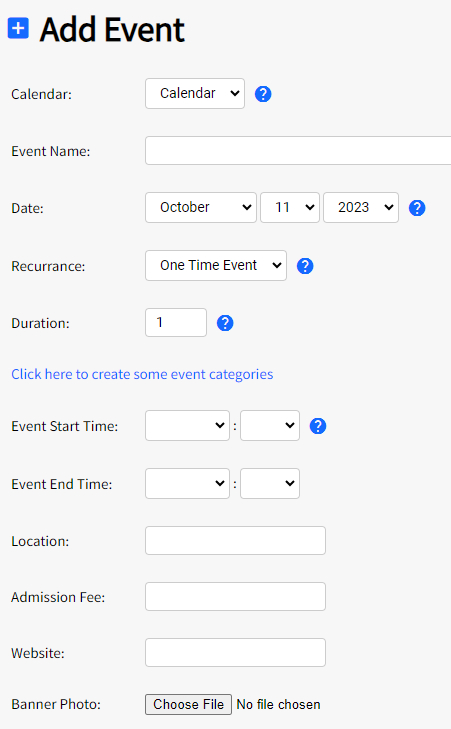 Calendar
Choose which calendar the event should appear in.
Event Name
Allows you to give the event a name that will show up in the calendar for each day the event occurs.
On the calendar, the event names are links which, when clicked on by a visitor, open a pop-up window displaying the event description. This window can show text, photos, maps, email links, and other links.
Date
Choose the start date of the event.
Recurrence
If the event occurs once then choose "One Time Event” and set the Duration to "1” (point 4.2.4). If it occurs for more than once, set the recurrence to daily (One Time Event), Weekly, Bi-Weekly, or Monthly and then set the Duration to "2” or more.
Duration
This option is used to set the number of Recurrences an event will last (point 4.2.3). If it is a weekly event for one year, set the Recurrence to "Weekly Event” and the Duration to "52”.
Event Start and End Time
Optional but you can set the start and end times of an event. This displays in the event.
Location, Admission Fee, Website are fields that show up at the top of an event about the content. These are optional and there to enhance the event details view.
Banner Photo
Upload a photo that displays at the top of the event. If you have designed some material for the event may be a good place to upload it. Or simply your branding.
Description (Event Content)
Use the editor to explain your event. Display in a pop-up window when someone clicks on the event.
When entering content for this event window, consider answering the following questions your visitor will likely be looking for depending on the event:
|
|
Adding Events to the Coming Events Plugin
-
Go to the Calendar Manager Module under Modules.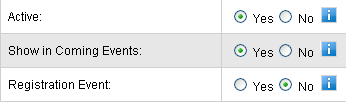
- Click on "List Calendar Events"
- Click Edit on event you wish to have on the "Upcoming Events". Look for the "Show in Coming Events" field and turn this on to show this event in coming events or off if you do not wish it to show in the coming events.
Tip: If the event is still not displaying, ensure that it is "Active".
Deciding what events display in the Coming Events plugin
- Go to the 'Template Manager' under the main SiteApex area 'Control Panel'.
- Click 'Plugins' on the template that contains your "Coming Events".
- Find and edit your Coming Events plugin in your template and adjust the "Number of days ahead to display" field to change how many days ahead you want events to display on your website.
- Save Plugin and Publish the template changes.
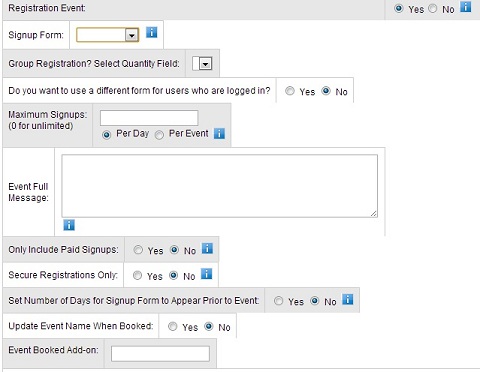
Registration Event