SiteApex Administration Help & Tutorials
Please use the topic links below to see a list of tutorials for that particular topic or module. Or you can use the search button to search for help on a specific topic.
Note: there are a few non-default modules listed here. Please contact sales if you are interested in any of these modules.
- Getting Started
- Page Editing
- Ad Manager
- Blog Module
- Bulletin Board (BBS)
- Calendar Manager
- File Manager
- Form Builder
- League Module
- Media & Resource Library
- News Letters
- News Manager
- Photo Album
- Staff List
- Shopping Cart
- Directories Module
- Indexed Articles
- Questionnaires
- Job Posting
- Mobile Devices
- Control Panel
- SMTP - Outgoing Mail
- Security & User Groups
- Templates
- Plugins
- SEO
- WCAG / Website Accessibility
How To Add Products To Your Shop Cart
- Log into your website admin area at http://yourdomain.com/admin
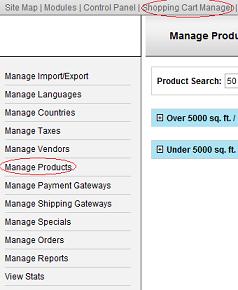
- Click on the Shop Cart Manager Link
- Click on Manage Products
Product Categories
If you plan on having more than a few products in your shopping cart, you should use product categories. Product Categories help to organize your shopping cart to make it easier for customers to find the product they're looking for.
If you don't have a good category created for the product you wish to add, add a new product category first. Follow the steps outlined in this article (link opens in a new tab).
Adding Products

Click the Add Product Icon at the top of the screen to begin adding your product. This will open a screen with a long list of options.
The first set of options...
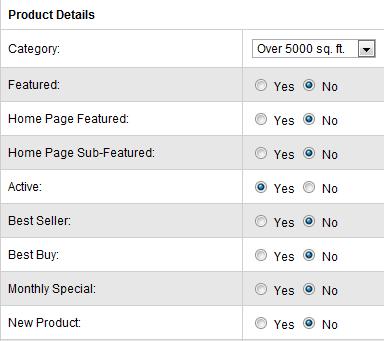
Category - Choose the category that this product should be listed under
Featured - If you choose yes, this product will be featured at the top of the list when a customer views the category this product is listed under. Note you can only have 2 featured products per category (featured articles in a sub-category also count).
Home Page Featured - If you choose yes, this product will be a featured item on the main landing page of your shopping cart
Home Page Sub-Featured - If you choose yes, this product will be a featured item on the main landing page of your shopping cart. Sub-featured items are listed below the Home Page Featured Item
Active - If you set this to 'no' the product will not be seen in your shopping cart - very handy if you have a product that's temporarily out of stock
Best Seller - Adds a best seller badge to the product listing
Best Buy - Adds a best buy badge to the product listing
Monthly Special - Adds a monthly special badge to the product listing
New Product - Adds a new product badge to the product listing
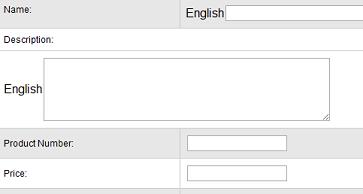
Name - Enter the name of your product
Description - Enter a description of your product
Product Number - If your product has an id number, you can enter it here, otherwise, leave this field blank
Price - Enter the price of your product
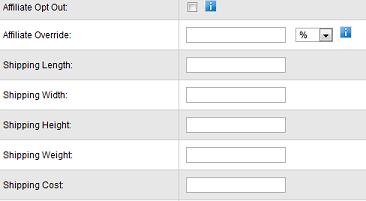
Affiliate Opt Out - If you are using the affiliate add-on for your shop cart, this option allows you to tell the affiliate system not to give affiliate commissions for this particular product. This will override any default commission rates you may have set.
Affiliate Override - If you are using the affiliate add-on for your shop cart, this option allows you to tell the affiliate system to use a unique affiliate payout rate for this particular product. This will override any default commission rates you may have set.
Shipping Length - shipping dimension
Shipping Width - shipping dimension
Shipping Height - shipping dimension
Shipping Weight - shipping dimension
Shipping Cost - Is you enter a price in here, it will override anything you've set up in your shipping gateways.

Specials - you can add a temporarily sale or special on your product. If you click the 'add special' link a box will pop up allowing you to enter details about your special (start and end date, sale details, and which products the special should apply to). If you've already created some specials, you can choose which one you want to apply to this product using the list above the 'add special' link.

Apply Override Tax to Order Location Only -
Override Tax - If this product has unique tax rules, you can apply an override tax rule using this field (note that you will need to create the override tax rule first using the 'manage taxes' area of your shop cart. Select the override tax rule you wish to have apply to this product. Leave unselected for none.
E-Product - Let the shopping cart know if this is an electronic file that you are selling (for example and mp3 or e-book pdf file). Leave at 'no' if this is NOT an E-product
E-Product File - use the choose file button to find and upload the electronic file you will be selling. You can ignore this field if this product is NOT and E-product.
Submit - Once all your product details are entered click 'submit' to save the details.

To learn more about managing product options, please read this article. (link will open in a new tab)
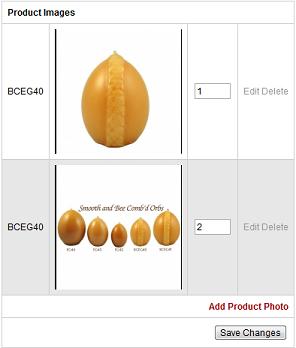
Product Photos
You will find options to upload photos of your product at the top of the product details screen.
Here you can find and upload pictures from your computer that will added to your product listing.
If you are adding more than 1 photo to your product, be sure to order the photos 1, 2, 3.. The numbering of the photos determines what order they are displayed to your site visitors. Photo number 1 will be the default photo that is shown in your product listing.
